初识
1. 中断(Interrupt)
中断包括硬件中断和软中断.
硬件中断是由外围硬件设备发出的中断信号引发的, 以请求处理器提供服务. 当I/O接口发出中断请求时, 会被像8259A和I/O APIC这样的中断控制器收集, 并发送到处理器. 硬件中断完全是随机产生的, 与处理器的执行并不同步. 当中断发生时, 处理器要先执行完当前的指令, 然后才对中断进行处理.
软中断是由 int n 指令引发的中断处理, n是中断号或者叫类型吗.
2. 异常(Exception)
异常就是16位汇编中的内部中断. 它们是处理器内部产生的中断, 表示在指令执行的过程中遇到了错误的状况. 当处理器执行一条非法指令, 或者因条件不具备, 指令不能正常执行时, 将引发这种类型的中断. 以上所列都是异常情况, 所以内部中断又叫异常或者异常中断. 比如在执行除法指令 div/idiv 时, 遇到了被0除的情况(除数是0); 在比如, 使用jmp指令发起任务切换时, 指令的操作数不是一个有效的TSS描述符选择子.
异常分为三种, 第一种是程序错误异常, 指处理器在执行指令的过程中, 检测到了程序中的错误, 并由此而引发的异常.
第二种是软件引发的异常. 这类异常通常由into, int3和bound指令主动发起. 这些指令允许在指令流的当前点上检查实施异常处理的条件是否满足. 举个例子, into指令在执行时, 将检查EFLAGS的OF标志, 如果满足为1的条件, 则引发异常.
第三种是机器检查异常. 这种异常是处理器型号相关的, 也就是说, 每种处理器都不太一样. 无论如何, 处理器提供了一种对硬件芯片内部和总线处理进行检查的机制, 当检测到错误是, 将引发异常.
根据异常情况的性质和严重性, 异常又分为以下三种, 并分别实施不同的处理.
- 故障(Faults). 故障通常是可以纠正的, 比如, 当处理器执行一个访问内存的指令时, 发现那个段或者页不在内存中(P = 0), 此时, 可以在异常处理程序中予以纠正(分配内存, 或者执行磁盘的换入换出操作), 返回时, 程序可以重新启动并不失连续性. 为了做到这一点, 当故障发生时, 处理器把机器状态恢复到引起故障的那条指令之前的状态, 在进入异常处理程序时, 压入栈中的返回地址(CS和EIP的内容)是指向引起故障的那条指令的, 而不像通常那样指向下一条指令. 如此一来, 当中断返回时, 将重新执行引起故障的那条指令, 而且不再出错(如果引起异常的情况已经妥善处理).
- 陷阱(Traps). 陷阱中断通常在执行了截获陷阱条件的指令之后立即产生, 如果陷阱条件成立的话. 陷阱通常用于调试目的, 比如单步中断指令int3和溢出检测指令into. 陷阱中断允许程序或任务在从中断处理过程返回之后继续进行而不失连续性. 因此, 当此异常发生时, 在转入异常处理程序之前, 处理器在栈中压入陷阱截获指令的下一条指令的地址.
- 终止(Aborts). 终止标志着最严重的错误, 诸如硬件错误, 系统表(GDT, LDT等)中的数据不一致或者无效. 这类异常总是无法精确地报告引起错误的指令的位置, 在这种错误发生时, 程序或者任务不可能重新启动. 一个比较典型的终止类异常是"双重故障"(中断号为8), 当发生一次异常之后, 处理器在转入该中断的处理程序时, 又发生了另外的异常(如该中断处理程序所在的段不在内存中, 或者栈溢出). 对于中断处理程序来说, 很难从栈中获得有关如何纠正此类错误的明确信息, 往往是发生极为重大的错误时才伴随着这种异常, 所以在继续执行引起此异常的程序或任务已相当困难, 操作系统通常只能把该任务从系统中抹去.
首先开始就回顾从KernelMoad到UserMode异常的流程
当int3触发时,系统流程是中断硬件程序 -> KiDebugTrapOrFault(r0) -> KiExceptionDispatch(r0) -> KiDispatchException(r0)->KiUserExceptionDispatcher(r3)
所以在UserMode下最好的方法就是HookKiUserExceptionDispatcher实现拦截异常消息
VOID
NTAPI
KiUserExceptionDispatcher(PEXCEPTION_RECORD ExceptionRecord,
                          PCONTEXT Context)
{
    EXCEPTION_RECORD NestedExceptionRecord;
    NTSTATUS Status;

    /* Dispatch the exception and check the result */
    if (RtlDispatchException(ExceptionRecord, Context))
    {
        /* Continue executing */
        Status = NtContinue(Context, FALSE);
    }
    else
    {
        /* Raise an exception */
        Status = NtRaiseException(ExceptionRecord, Context, FALSE);
    }

    /* Setup the Exception record */
    NestedExceptionRecord.ExceptionCode = Status;
    NestedExceptionRecord.ExceptionFlags = EXCEPTION_NONCONTINUABLE;
    NestedExceptionRecord.ExceptionRecord = ExceptionRecord;
    NestedExceptionRecord.NumberParameters = Status;

    /* Raise the exception */
    RtlRaiseException(&NestedExceptionRecord);
}
然后就是AddVectoredExceptionHandler (向量化异常)
PVOID AddVectoredExceptionHandler(
  ULONG                       First,
  PVECTORED_EXCEPTION_HANDLER Handler
);
这个也俗称veh,但是我不怎么推荐使用这个,因为不是最优先的。
检测补丁
说完上面的两个函数,那自然检测这种类型的补丁也有了眉头
自身接管KiUserExceptionDispatcher,这样别人Hook了也能检测到,在配合故意触发的异常
实现补丁
写这种补丁之前,要注意x64系统上wow64进程,可以跟x64进程一样的方法处理,因为x64的ntdll跟wow64 ntdll64一样
首先就是HookKiUserExceptionDispatcher,这里我为了方便简洁就简单的Hook了
所以我就简单的写了个框架
main.cpp
#include <Windows.h>
#include <stdio.h>
#if defined(_WIN64)
#define HookLength				16
#define DetourLength			14
#else
#define HookLength				5
#define DetourLength			5
#endif
extern "C" VOID KiUserExceptionDispatcher_asm();
#define OUTINFO_0_PARAM(fmt) {CHAR sOut[256];CHAR sfmt[50];sprintf_s(sfmt,"%s%s","INFO--",fmt);sprintf_s(sOut,(sfmt));OutputDebugStringA(sOut);}
BOOLEAN HookAddr(IN PVOID Address, IN PVOID Proxy, OUT PVOID* Detour)
{
	//ULONG PatchSize = GetPatchSize(Address, HookLength);//这里PatchSize可以使用zydis库
	ULONG PatchSize = 16;
	*Detour = VirtualAlloc(NULL,PatchSize + DetourLength, MEM_COMMIT, PAGE_READWRITE);
	if (*Detour == NULL)return FALSE;
#if defined(_WIN64)
	// This shellcode can breach the 4GB-limit in AMD64 architecture.
	// No register would be destroyed.
	/*
	  ShellCode Overview:
	  push rax			-- 50
	  mov rax, proxy	-- 48 B8 XX XX XX XX XX XX XX XX
	  xchg [rsp],rax	-- 48 87 04 24
	  ret				-- C3
	  16 bytes in total. This shellcode is provided By AyalaRs.
	  This could be perfect ShellCode in my opinion.
	  Note that all functions in Windows Kernel are 16-bytes aligned.
	  Thus, this shellcode would not break next function or overflow to next page.
	*/
	BYTE HookCode[16] = { 0x50,0x48,0xB8,0,0,0,0,0,0,0,0,0x48,0x87,0x04,0x24,0xC3 };
	BYTE DetourCode[14] = { 0xFF,0x25,0x0,0x0,0x0,0x0,0,0,0,0,0,0,0,0 };
	*(PULONG64)((ULONG64)HookCode + 3) = (ULONG64)Proxy;
	*(PULONG64)((ULONG64)DetourCode + 6) = (ULONG64)Address + PatchSize;
#else
	//In Win32, this is a common trick of eip redirecting.
	BYTE HookCode[5] = { 0xE9,0,0,0,0 };
	BYTE DetourCode[5] = { 0xE9,0,0,0,0 };
	*(PULONG)((ULONG)HookCode + 1) = (ULONG)Proxy - (ULONG)Address - 5;
	*(PULONG)((ULONG)DetourCode + 1) = (ULONG)Address - (ULONG)Detour - 5;
#endif
	DWORD old_pr;
	VirtualProtect(Address, 1, PAGE_READWRITE, &old_pr);
	RtlCopyMemory(*Detour, Address, PatchSize);
	RtlCopyMemory((PVOID)((ULONG_PTR)*Detour + PatchSize), DetourCode, DetourLength);
	RtlCopyMemory(Address, HookCode, HookLength);
	VirtualProtect(Address, 1, old_pr, &old_pr);
	return TRUE;
}
typedef VOID(*pfnKiUserExceptionDispatcher)
(
	PEXCEPTION_RECORD ExceptionRecord,
	PCONTEXT Context
);
typedef NTSTATUS(*NTCONTINUE)(IN PCONTEXT Context,
	IN BOOLEAN TestAlert);
pfnKiUserExceptionDispatcher Old_KiUserExceptionDispatcher = NULL;
 NTCONTINUE pfn_NtContinue=(NTCONTINUE)0x00007FFB74C4D570;
extern "C" VOID NTAPI KiUserExceptionDispatcher(PEXCEPTION_RECORD ExceptionRecord,
	PCONTEXT Context)
{
	/**
		00007FFB74C50B80 | FC | cld |
		00007FFB74C50B81 | 48:8B05 A8E60D00 | mov rax, qword ptr ds : [7FFB74D2F230] |
		00007FFB74C50B88 | 48 : 85C0 | test rax, rax |
		00007FFB74C50B8B | 74 0F | je ntdll.7FFB74C50B9C |
	*/
	//Old_KiUserExceptionDispatcher(ExceptionRecord, Context); 示范的话就不返回了 因为有重定位,如果想要成功Hook 可以参考https://blog.csdn.net/A289672082/article/details/113481696
	//OUTINFO_0_PARAM("ExceptionAddress:%p  ExceptionCode:%x\n", ExceptionRecord->ExceptionAddress, ExceptionRecord->ExceptionCode);
	if (ExceptionRecord->ExceptionCode == STATUS_BREAKPOINT)
		Context->Rip++;
	pfn_NtContinue(Context,FALSE);
}
void main()
{


	HookAddr((PVOID)0x00007FFB74C50B80, KiUserExceptionDispatcher_asm, (PVOID*)&Old_KiUserExceptionDispatcher);//只是示范 如果真要Hook还是规范点好
	MessageBoxA(0, "hi", "hi", 0);
	DebugBreak();
	MessageBoxA(0, "hi", "hi", 0);
}
Hook.asm
EXTERN KiUserExceptionDispatcher: proc
.CODE
KiUserExceptionDispatcher_asm proc
    mov rcx, rsp
    add rcx, 4F0h
    mov rdx, rsp
    jmp KiUserExceptionDispatcher
KiUserExceptionDispatcher_asm endp
END
然后试着运行一下 可以看到程序正确的处理了异常
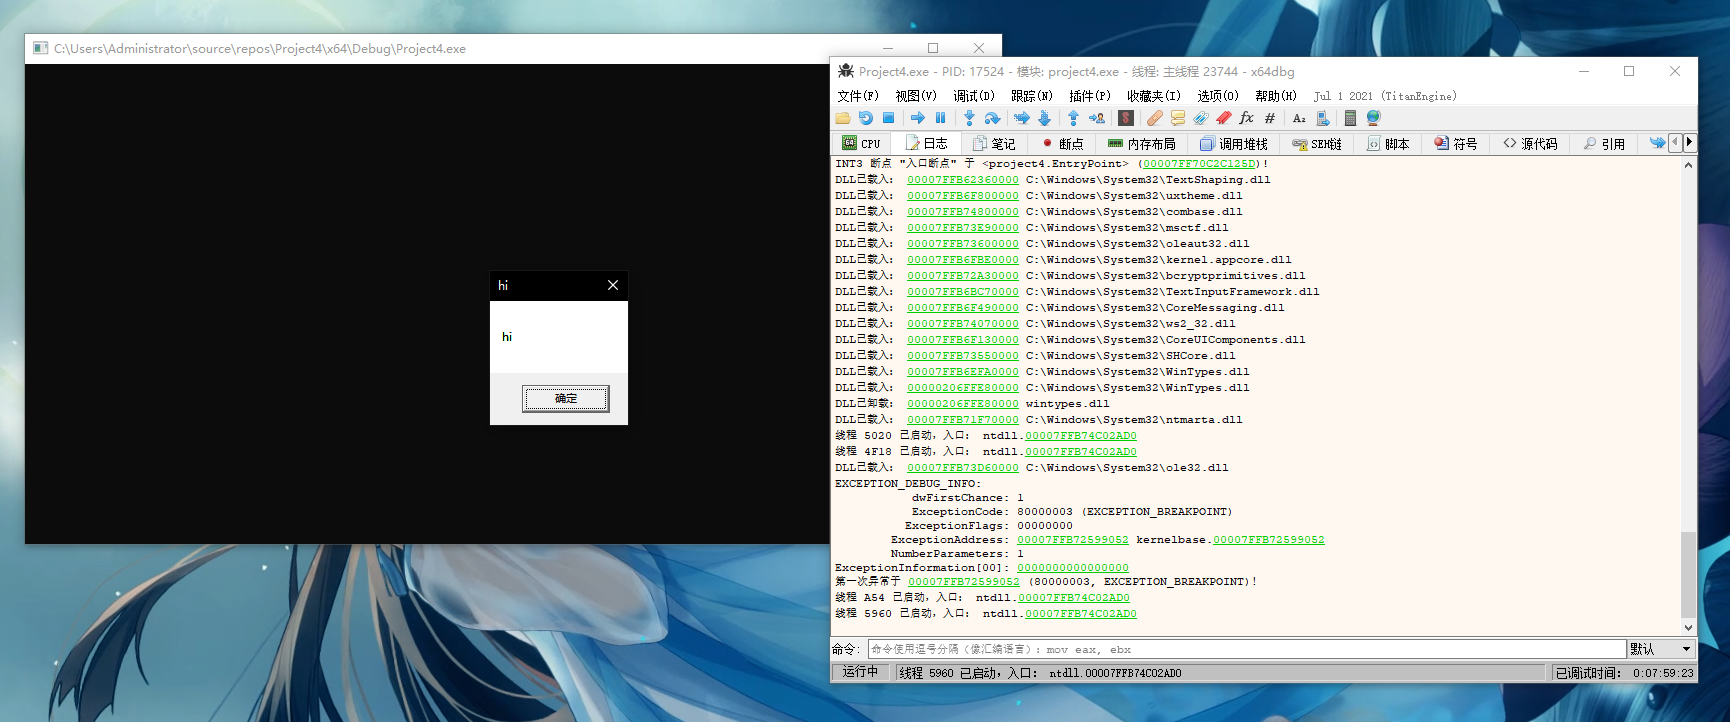
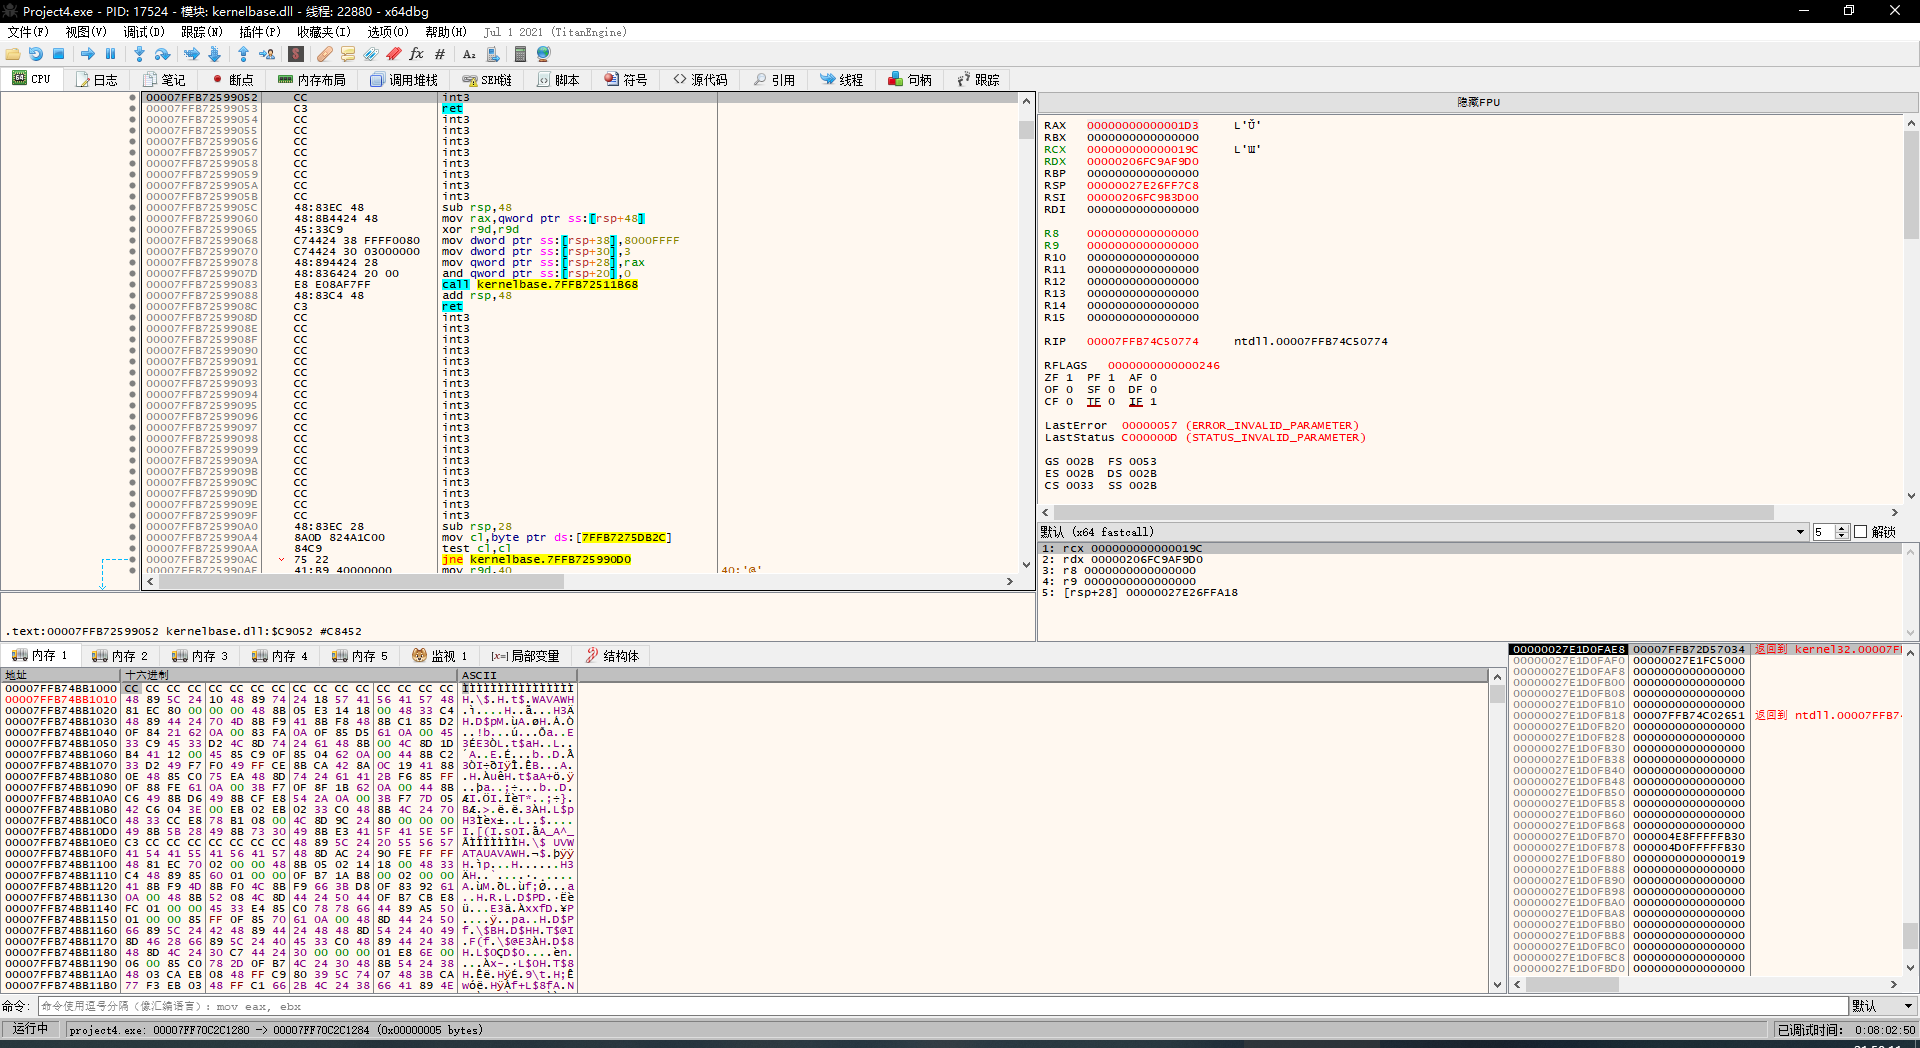
关键代码就是
if (ExceptionRecord->ExceptionCode == STATUS_BREAKPOINT)
Context->Rip++;
也就是说这段代码可以正常运行并处理异常
INT3
int3断点就是上面演示的,至于其他的一些小问题就过滤了,只不过int3需要写入内存,容易被crc给探测到
硬件断点
说到硬件断点 那么就必须了解DR0-DR7了,我这里推荐AMD手册
AMD64 Architecture Programmer’s Manual, Volumes 1-5, 40332, 24592, 24593, 24594, 26568, 26569 13.1 Software-Debug Resources
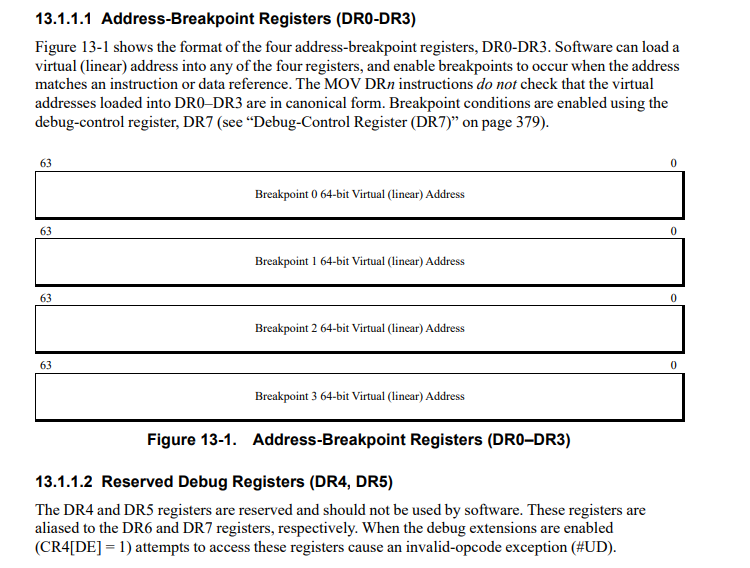
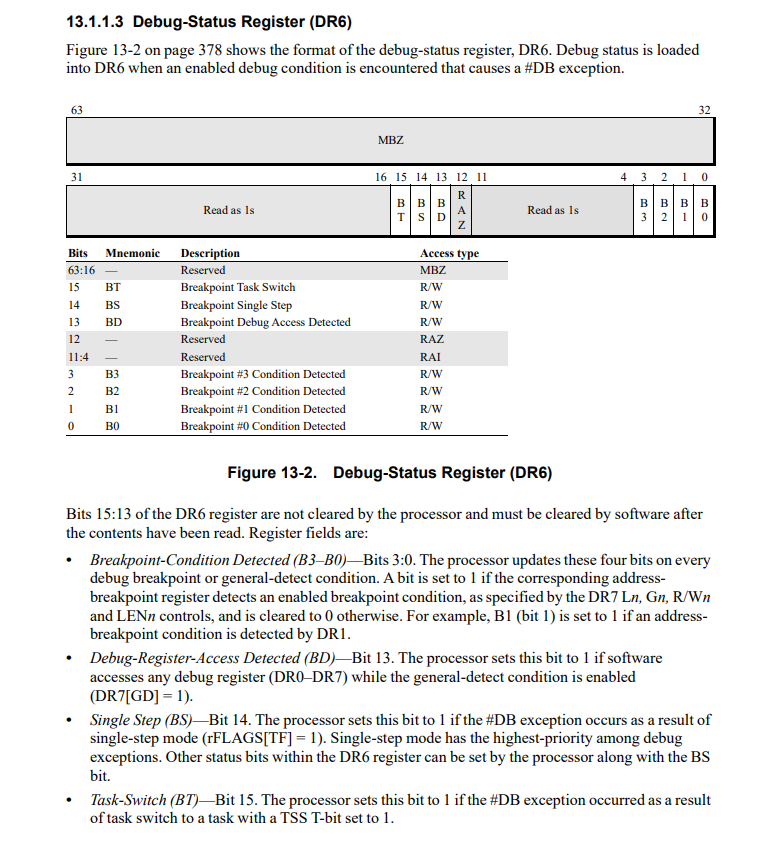
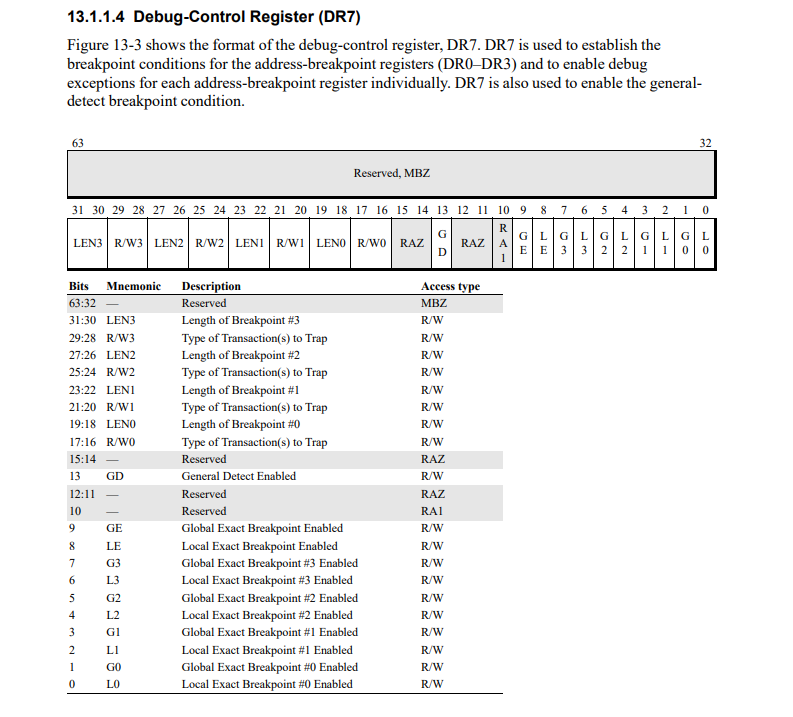
讲的很详细 可以去看看
DR0-DR3填虚拟地址就好了 DR7是调试控制寄存器 DR6是调试状态寄存器.
如果看完了AMD手册上的内容后
我这里就不涉及设置寄存器和获取寄存器了,我就讲讲怎么设置调试寄存器,和中断后怎么判断调试寄存器
根据手册上的代码 我们可以把dr6 dr7转成结构体
typedef struct tagDebugReg7
{
	unsigned L0 : 1;  // 对Dr0保存的地址启用 局部断点
	unsigned G0 : 1;  // 对Dr0保存的地址启用 全局断点
	unsigned L1 : 1;  // 对Dr1保存的地址启用 局部断点
	unsigned G1 : 1;  // 对Dr1保存的地址启用 全局断点
	unsigned L2 : 1;  // 对Dr2保存的地址启用 局部断点
	unsigned G2 : 1;  // 对Dr2保存的地址启用 全局断点
	unsigned L3 : 1;  // 对Dr3保存的地址启用 局部断点
	unsigned G3 : 1;  // 对Dr3保存的地址启用 全局断点
					  /*
					  // 【以弃用】用于降低CPU频率,以方便准确检测断点异常
					  */
	unsigned GL : 1; //			8
	unsigned GE : 1; //			9
	unsigned undefined_1 : 1; //1       10
	unsigned RTM : 1; //        11
	unsigned undefined_0 : 1; //0       12
	unsigned GD : 1; //		   13
	unsigned undefined2 : 2; // 00
		/*
	保存Dr0~Dr3地址所指向位置的断点类型(RW0~3)与断点长度(LEN0~3),状态描述如下:
	00:执行 01:写入  11:读写
	00:1字节 01:2字节  11:4字节
	*/
	unsigned RW0 : 2;  // 设定Dr0指向地址的断点类型
	unsigned LEN0 : 2;  // 设定Dr0指向地址的断点长度
	unsigned RW1 : 2;  // 设定Dr1指向地址的断点类型
	unsigned LEN1 : 2;  // 设定Dr1指向地址的断点长度
	unsigned RW2 : 2;  // 设定Dr2指向地址的断点类型
	unsigned LEN2 : 2;  // 设定Dr2指向地址的断点长度
	unsigned RW3 : 2;  // 设定Dr3指向地址的断点类型
	unsigned LEN3 : 2;  // 设定Dr3指向地址的断点长度
#ifdef AMD64
	unsigned undefined3 : 8;
	unsigned undefined4 : 8;
	unsigned undefined5 : 8;
	unsigned undefined6 : 8;
#endif
} DebugReg7;

typedef struct DebugReg6
{
	/*
	//     断点命中标志位,如果位于DR0~3的某个断点被命中,则进行异常处理前,对应
	// 的B0~3就会被置为1。
	*/
	unsigned B0 : 1;  // Dr0断点触发置位
	unsigned B1 : 1;  // Dr1断点触发置位
	unsigned B2 : 1;  // Dr2断点触发置位
	unsigned B3 : 1;  // Dr3断点触发置位
	unsigned undefined1 : 9; // 011111111
	unsigned BD : 1;  // 调制寄存器本身触发断点后,此位被置为1
	unsigned BS : 1;  // 单步异常被触发,需要与寄存器EFLAGS的TF联合使用
	unsigned BT : 1;  // 此位与TSS的T标志联合使用,用于接收CPU任务切换异常
	unsigned RTM : 1; //0=triggered
	unsigned undefined2 : 15; // 111111111111111
#ifdef AMD64
	unsigned undefined3 : 8;
	unsigned undefined4 : 8;
	unsigned undefined5 : 8;
	unsigned undefined6 : 8;
#endif
} DebugReg6;
以及 断点类型 断点长度
typedef enum { bt_OnInstruction = 0, bt_OnWrites = 1, bt_OnIOAccess = 2, bt_OnReadsAndWrites = 3 } BreakType;
typedef enum { bl_1byte = 0, bl_2byte = 1, bl_8byte = 2/*Only when in 64-bit*/, bl_4byte = 3 } BreakLength;
设置执行硬件断点
BOOLEAN SetExecBreakPoint(ULONG64  Address)
{
	DebugReg7 Debug_dr7 = debugger_dr7_getValue();
	DebugReg6 Debug_dr6 = debugger_dr6_getValue();
	if (Debug_dr7.L0 == NULL)
	{
		// 启动断点
		Debug_dr7.L0 = 1;
		// 设置断点位置
		debugger_dr0_setValue(Address);
		// 设置断点的类型(执行)
		Debug_dr7.RW0 = 0;
		// 设置断点的长度,执行断点必须为0
		Debug_dr7.LEN0 = 0;
		debugger_dr7_setValue(Debug_dr7);
		DebuggerState.FakedDebugRegisterState[1].DR0 = Address;
		DebuggerState.FakedDebugRegisterState[1].DR7 = debugger_dr7_getValueDword();
	}
	else if (Debug_dr7.L1 == NULL)
	{
		Debug_dr7.L1 = 1; 	debugger_dr1_setValue(Address);
		Debug_dr7.RW1 = 0;
		Debug_dr7.LEN1 = 0;
		debugger_dr7_setValue(Debug_dr7);
		DebuggerState.FakedDebugRegisterState[1].DR1 = Address;
		DebuggerState.FakedDebugRegisterState[1].DR7 = debugger_dr7_getValueDword();
	}
	else if (Debug_dr7.L2 == NULL)
	{
		Debug_dr7.L2 = 1; 	debugger_dr2_setValue(Address);
		Debug_dr7.RW2 = 0;
		Debug_dr7.LEN2 = 0;
		debugger_dr7_setValue(Debug_dr7);
		DebuggerState.FakedDebugRegisterState[1].DR2 = Address;
		DebuggerState.FakedDebugRegisterState[1].DR7 = debugger_dr7_getValueDword();
	}
	else if (Debug_dr7.L3 == NULL)
	{
		Debug_dr7.L3 = 1; 	debugger_dr3_setValue(Address);
		Debug_dr7.RW3 = 0;
		Debug_dr7.LEN3 = 0;
		debugger_dr7_setValue(Debug_dr7);
		DebuggerState.FakedDebugRegisterState[1].DR3 = Address;
		DebuggerState.FakedDebugRegisterState[1].DR7 = debugger_dr7_getValueDword();
	}
	else
	{
		// 所有的寄存器都被设置了
		return FALSE;
	}


	return TRUE;
}
设置读写硬件断点,读写的话地址是需要对齐的
BOOLEAN SetRwBreakPoint(ULONG64 address, BreakType BreakType, BreakLength BreakLength)
{
	DebugReg7 Debug_dr7 = debugger_dr7_getValue();
	DebugReg6 Debug_dr6 = debugger_dr6_getValue();
	switch (BreakLength)
	{
	     case 1:
			 address = address - address % 2;
			 break;
		 case 3:
			 address = address - address % 4;
			 break;
		 case 2:
			 address = address - address % 8;
			 break;
	}


	if (Debug_dr7.L0 == 0)//L0没有被使用
	{
		debugger_dr0_setValue(address);//在Dr0寄存器中写入中断地址
		Debug_dr7.RW0 = BreakType;//
		Debug_dr7.LEN0 = BreakLength;//(1字节长度)
		Debug_dr7.L0 = 1;//启用该断点
		debugger_dr7_setValue(Debug_dr7);
	}
	else if (Debug_dr7.L1 == 0)
	{
		debugger_dr1_setValue(address);
		Debug_dr7.RW1 = BreakType;//
		Debug_dr7.LEN1 = BreakLength;//(1)
		Debug_dr7.L1 = 1;
		debugger_dr7_setValue(Debug_dr7);
	}
	else if (Debug_dr7.L2 == 0)
	{
		debugger_dr2_setValue(address);
		Debug_dr7.RW1= BreakType;//
		Debug_dr7.LEN1 = BreakLength;//(1)
		Debug_dr7.L1 = 1;
		debugger_dr7_setValue(Debug_dr7);
	}
	else if (Debug_dr7.L3 == 0)
	{
		debugger_dr3_setValue(address);
		Debug_dr7.RW2 = BreakType;//
		Debug_dr7.LEN2 = BreakLength;//(1)
		Debug_dr7.L2= 1;
		debugger_dr7_setValue(Debug_dr7);
	}
	else
	{
		return FALSE;
	}
	return TRUE;
}
如果硬件断点被触发 我们可以这么写
	if (ExceptionRecord->ExceptionCode == STATUS_SINGLE_STEP)
	{
		UINT_PTR temp = ContextFrame.Dr6;
		DebugReg6 Ring3_Debug_dr6 = *(DebugReg6*)&temp;
		if (Debug_dr6.B0 == 1)//B1 B2 B3
		{
			//DR0触发
		}

	}
然后就是硬件断点触发了,继续运行的问题 一般的话可能会设置ContextFrame.EFlags->TF,但是也可以设置RF
typedef struct
{
	unsigned CF : 1;       //进位或错位
	unsigned Reserve1 : 1;
	unsigned PF : 1;       //计算结果低位包含偶数个1时,此标志为1
	unsigned Reserve2 : 1;
	unsigned AF : 1;       //辅助进位标志,当位3处有进位或借位标志时该标志为1
	unsigned Reserve3 : 1;
	unsigned ZF : 1;       //计算结果为0时,此标志为1
	unsigned SF : 1;       //符号标志,计算结果为负时该标志为1
	unsigned TF : 1;       //陷阱标志,此标志为1时,CPU每次仅会执行1条命令
	unsigned IF : 1;       //中断标志,为0时禁止响应(屏蔽中断),为1时恢复
	unsigned DF : 1;       //方向标志
	unsigned OF : 1;       //溢出标志,计算结果超出机器所表达范围时为1,否则为0
	unsigned IOPL : 2;       //用于标明当前任务的I/O特权级
	unsigned NT : 1;       //任务嵌套标志
	unsigned Reserve4 : 1;
	unsigned RF : 1;       //调试异常相应控制标志位,为1禁止响应指令断点异常
	unsigned VM : 1;       //为1时启用虚拟8086模式
	unsigned AC : 1;       //内存对齐检查标志
	unsigned VIF : 1;       //虚拟中断标志
	unsigned VIP : 1;       //虚拟中断标志
	unsigned ID : 1;       //CPUID检查标志
	unsigned reserved5 : 10; // 22-31
#ifdef AMD64
	unsigned reserved6 : 8;
	unsigned reserved7 : 8;
	unsigned reserved8 : 8;
	unsigned reserved9 : 8;
#endif
} EFLAGS, * PEFLAGS;
((PEFLAGS)&ContextFrame.EFlags)->RF = 1;
设置成功后就不用管了,也不怕下一次断点失效
